

Z offset controls how close your nozzle is to the bed, and getting it right is the difference between prints sticking or failing. To set Z offset correctly, lower the nozzle until filament is slightly squished—not round and not smeared.
If your first layer fails, this is almost always the root cause.
This post contains affiliate links. As an Amazon Associate, I earn from qualifying purchases. This support helps us test more printers, materials, and tools so we can give you real, experience-based recommendations.
What Z Offset Actually Does
Z offset is the distance between your nozzle and the build plate after homing.
- Too high → filament won’t stick
- Too low → nozzle drags and smears filament
- Just right → smooth, slightly flattened lines
👉 This is the single most important setting for print success.
How to Set Z Offset (Step-by-Step)
1. Home Your Printer
Start clean:
- Auto home (G28)
- Move nozzle to center of bed
2. Use Paper Method (Baseline)
Place a piece of paper under the nozzle.
Lower Z until:
- you feel slight resistance
- paper can still move
👉 This gets you close—but not perfect.
3. Print a First Layer Test
Now dial it in live.
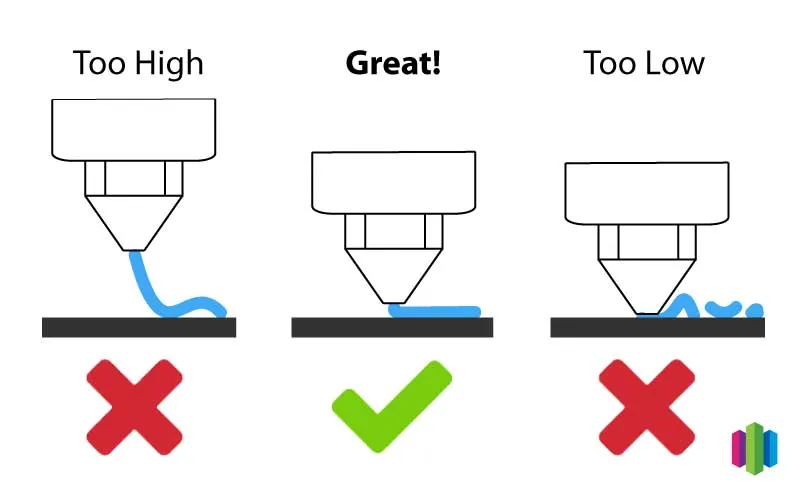
Look for:
Too high:
- round lines
- gaps between lines
Too low:
- smeared filament
- rough surface
Perfect:
- lines slightly flattened
- no gaps
- smooth surface
4. Adjust in Small Steps
Change Z offset by:
- 0.02–0.05 mm at a time
👉 Small changes = big difference
5. Lock It In
Once perfect:
- save settings
- note your value
Quick Visual Guide
| Z Offset State | Result |
|---|---|
| Too High | No adhesion, gaps |
| Perfect | Smooth, squished lines |
| Too Low | Smearing, rough surface |

Common Mistakes That Ruin Z Offset
- Adjusting too much at once
- Skipping live first layer tuning
- Trusting paper method alone
- Not cleaning the bed first
- Changing settings mid-print randomly
Tools That Actually Help (Optional)
- BLTouch / CR-Touch → consistent leveling
- First layer test prints → visual calibration
- PEI build plate → easier adhesion feedback
👉 These make it easier, not automatic.
Related Fixes You Should Check
Z offset directly affects:
👉 If your Z offset is wrong, nothing else matters.
Conclusion
Setting Z offset correctly is the fastest way to fix 3D printing issues. Get your nozzle height dialed in, and you’ll immediately see better adhesion, cleaner prints, and fewer failures.
Master this—and everything else gets easier.